A frequent requirement in the Share Point Projects is Displaying Multiple Libraries together in a single web part. It can be achieved by various methods but I am going to create it through Share Point Designer 2007.
In this article we will come to know how it can be done step by step.
1. The Important thing here to be noted is, whatever may be the number of Document Library going to be merged here, and it should contain the same number of columns and name.
2. If not, this web part won’t work.
3. Create two document libraries (Example : Test1,Test 2)
4. I have created 4 columns such as Type, Title, Name, and Created by in both document libraries.
5. Now, we are going to use the designer 2007 here to proceed.
6. Open the site in designer –> create an .aspx page.
7. In the right side of the designer -> go to Data Source Library -> Linked Sources
 8. In the Linked Sources click -> create a New Linked Source.
 9. We have Three Tabs here ,
General
a. In General -> Give the Name of the web part
b. In Description-> Give the Description of your web part
c. In Key Words -> Give the Keywords if u like
Source
a. Click Configure Linked Source -> Pop up window will Show all the Available Data Sources as shown below
 b. Under the SharePoint Libraries -> add the two document libraries created (Test1,Test 2)
c. Click Next Button

d. Leave the default option (Merger the contents of the data sources….)
e. Click Finish and it show it as shown below.
 f. Click ok.
10. Now open the page where you want to add the web part in the designer. Then click “Click to insert a web part” option in the page.
11. In the Data Source Library under Linked Sources you will see the created (here I gave it as Multiple Document Libraries in Single List) the linked source as shown below.
 12. Click on the Drop Down in the created Linked Source and click Show Data which will show the “Data Source Details” as shown below.
 13. You will see all the columns present in the Document Libraries.
14. Press CTRL and select the columns which you want to display in the Web Part.
15. Then Click on the Insert Selected Fields as… -> Select Multiple Item View
16. I have selected Name for Use in Forms, Created by and Path from the columns and inserted it in the site which is as follows.
 17. We have to format this view so that it looks good to view.
a. First Column is formatted so that select the Format as with Label
 b. Then second column created by in the same way select Format as with Label
c. Finally third column select Format as with hyperlink and give the following the pop-up window.
Address: /{@FileDirRef}
Label: {@FileDirRef}
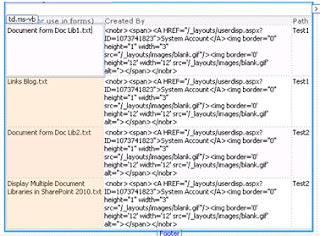
18. We have completed creating the web part. Finally it will look as shown below.

So we are now able to list and view the documents from two document libraries as shown below !!!

In this article we will come to know how it can be done step by step.
1. The Important thing here to be noted is, whatever may be the number of Document Library going to be merged here, and it should contain the same number of columns and name.
2. If not, this web part won’t work.
3. Create two document libraries (Example : Test1,Test 2)
4. I have created 4 columns such as Type, Title, Name, and Created by in both document libraries.
5. Now, we are going to use the designer 2007 here to proceed.
6. Open the site in designer –> create an .aspx page.
7. In the right side of the designer -> go to Data Source Library -> Linked Sources
General
a. In General -> Give the Name of the web part
b. In Description-> Give the Description of your web part
c. In Key Words -> Give the Keywords if u like
Source
a. Click Configure Linked Source -> Pop up window will Show all the Available Data Sources as shown below

c. Click Next Button

d. Leave the default option (Merger the contents of the data sources….)
e. Click Finish and it show it as shown below.

10. Now open the page where you want to add the web part in the designer. Then click “Click to insert a web part” option in the page.
11. In the Data Source Library under Linked Sources you will see the created (here I gave it as Multiple Document Libraries in Single List) the linked source as shown below.


14. Press CTRL and select the columns which you want to display in the Web Part.
15. Then Click on the Insert Selected Fields as… -> Select Multiple Item View

a. First Column is formatted so that select the Format as with Label

c. Finally third column select Format as with hyperlink and give the following the pop-up window.
Address: /{@FileDirRef}
Label: {@FileDirRef}
18. We have completed creating the web part. Finally it will look as shown below.

So we are now able to list and view the documents from two document libraries as shown below !!!


Hi,
ReplyDeleteA Useful Post here. Thanks for Sharing!