Showing posts with label JQuery. Show all posts

Oct 9, 2017

Check if current user is member of a SharePoint group using JQuery

Scenario
This code will help you to check if the current user is a member of a group.
Suppose you want to check if the current user is member of a Owners group or not. Just update the "grpName" variable value and run the code 😎
Steps to use the code
1. Use the Script Editor web part and add this code to check if a user is in a SP group 
2. Or use this code as a reference in a Content Editor web part
3. Use this script as a reference in a SharePoint custom list forms or in any SP pages
Code
$(document).ready(function (e) {

    ExecuteOrDelayUntilScriptLoaded(IsCurrentUserMemberOfGroup, "sp.js");
});

function IsCurrentUserMemberOfGroup() {
    var grpName = "Site Owners";
    var userInGroup;
    var currentContext = new SP.ClientContext.get_current();
    var currentWeb = currentContext.get_web();

    var currentUser = currentContext.get_web().get_currentUser();
    currentContext.load(currentUser);

    var allGroups = currentWeb.get_siteGroups();
    currentContext.load(allGroups);

    var group = allGroups.getByName(grpName);
    currentContext.load(group);

    var groupUsers = group.get_users();
    currentContext.load(groupUsers);

    currentContext.executeQueryAsync(OnSuccess, OnFailure);

    function OnSuccess(sender, args) {

        var groupUserEnumerator = groupUsers.getEnumerator();
        while (groupUserEnumerator.moveNext()) {
            var groupUser = groupUserEnumerator.get_current();
            if (groupUser.get_id() == currentUser.get_id()) {
                userInGroup = true;
                break;
            }
        }
        if (userInGroup) {
            //alert("user exists in the group");
            //do some operation.
        }

        else {
            //alert("user doestn't exist in the group");
        }

    }

    function OnFailure(sender, args) {
        //error message.
    }
}
Happy coding!!!

Jul 25, 2017

Display SharePoint List or Library in Data table

Introduction:
Today we are going to learn an interesting article of how to use DataTables.js JQuery 🔗 in SharePoint(2013, 2016, Online - O365).
Since SharePoint 2013 has released, the way how the data is created, updated & displayed has changed a lot - I mean Client Side scripting has become more powerful. Server Side Coding in SharePoint (JSOM - Java Script Object Model) has the following uses or advantages over server side coding which are:
1. Faster data rendering
2. Easy to debug from browser
3. Easy & faster validation response to end users
4. Just add a content editor web part and add the code 😁
5. No IIS reset required
6. Just use client desktop and no SharePoint installation required
7. No Visual Studio (why spent extra money on license?😎)
8. Just use a Editor to write and format the code.
💡 I have recently started using Microsoft Visual Studio Code. Give a try, you will never use other editors. What a powerful editor! Download from this link and it is FREE 🔗
Scenario:
What if you were given a task to display a list or a library in a SharePoint page which has 1000's of records in it. Also, it has to load faster, need a free text search, paging features, etc.? But you have no server side access for coding or server deployments allowed 😜
Solution: 
Obviously, any SharePoint developer will go for the option SharePoint Java Script Object Model (JSOM). But how to create a table, searchable content, etc. DataTables.JS is a Table plug-in for JQuery. It is used for display the HTML content as Table.
Let's not wait and create a custom SharePoint list(here named it as Finance Sample Data). Download the data used for this example here 🔗
This is how the logic/solution for this scenario is implemented:
1. Upload the JQuery, DataTable.JS, CSS, Images required in Site Assets Library(best practice in SharePoint)
2. Create a simple text file in which add the reference to JS, CSS, Images, etc. Then add the DIV tags for creating a section and then add a TABLE tag for displaying the content, then document.ready() function and finally custom JS functions. You can also have HTML file and JS files separately.
3. In document.ready(), call the custom function which will query the data using CAML query (I haven't tried using REST API since there will be an issue when you query 1000 items at a time or when paging is enabled, if you have any thoughts share it in the command), load the JSON data as HTML tags and draw a data table using the data objects.
💡 Learn the basics of CAML query in SharePoint by reading this article: CAML Query tutorial for SharePoint 🔗
Code for reference:
<!-- JS References -->
<script src="../../SiteAssets/Scripts/jquery-1.12.0.min.js"></script>
<script src="../../SiteAssets/Scripts/jquery.dataTables.min.js"></script>

<!--CSS References-->
<link href="../../SiteAssets/CSS/jquery.dataTables.min.css" rel="stylesheet">

<!--HTML TAGS-->
<div id="divFinanceReportTable">
    <h3>
        <div>
            <p id="FinanceReportTitle"><b>Finance Sample Data</b></p>
        </div>
    </h3>
    <table style="width: 100%;" id="idFinanceReportList" cellspacing="0">
    </table>
    <div></div>
</div>

<!--Document.ready()-->
<script>
    var txtHTMLFinanceReport = "";
    var tableFinanceReport;
    var allFinanceReportData;

    $(document).ready(function () {
        //Load Finance Report List on page load
        SP.SOD.executeFunc('sp.js', 'SP.ClientContext', loadFinanceReportList);
    });

    //Load Tools from Tools List
    function loadFinanceReportList() {
        var currentClientContext = new SP.ClientContext.get_current();
        var currentWeb = currentClientContext.get_web();
        var financeReportDataList = currentWeb.get_lists().getByTitle('Finance Sample Data');
        var camlQuery = new SP.CamlQuery();
        var loadFinanceReportQuery = new SP.CamlQuery.createAllItemsQuery();
        var query = '<View><Query><OrderBy><FieldRef Name="ID" Ascending="TRUE"/></OrderBy></Query></View>';
        loadFinanceReportQuery.set_viewXml(query);
        allFinanceReportData = financeReportDataList.getItems(loadFinanceReportQuery);
        currentClientContext.load(allFinanceReportData);
        currentClientContext.executeQueryAsync(Function.createDelegate(this, this.success), Function.createDelegate(this, this.failed));
    }
    function success() {
        var segment = null;
        var country = null;
        var product = null;
        var unitsSold = null;
        var manufacturingPrice = null;
        var salesPrice = null;
        var grossSale = null;
        var sales = null;
        var profit = null;

        var USCurrency = { style: "currency", currency: "USD" };

        txtHTMLFinanceReport = "";

        var Header = "<thead>" +
            "<tr>" +
            "<th>Segment</th>" +
            "<th>Country</th>" +
            "<th>Product</th>" +
            "<th>Units Sold</th>" +
            "<th>Manufacturing Price</th>" +
            "<th>Sales Price</th>" +
            "<th>Gross Sale</th>" +
            "<th>Sales</th>" +
            "<th>Profit</th>" +
            "</tr>" +
            "</thead>";

        txtHTMLFinanceReport += Header;
        txtHTMLFinanceReport += "<tbody class='row-border hover order-column dataTable' role='grid'>";

        var listEnumerator = allFinanceReportData.getEnumerator();

        while (listEnumerator.moveNext()) {
            var currentItem = listEnumerator.get_current();

            if (currentItem.get_item('Title') != null) {
                segment = currentItem.get_item('Title');
            } else {
                segment = "";
            }

            if (currentItem.get_item('Country') != null) {
                country = currentItem.get_item('Country');
            } else {
                country = "";
            }

            if (currentItem.get_item('Product') != null) {
                product = currentItem.get_item('Product');
            } else {
                product = "";
            }

            if (currentItem.get_item('Units_x0020_Sold') != null) {
                unitsSold = currentItem.get_item('Units_x0020_Sold');
            } else {
                unitsSold = "";
            }

            if (currentItem.get_item('Manufacturing_x0020_Price') != null) {
                manufacturingPrice = currentItem.get_item('Manufacturing_x0020_Price');
                manufacturingPrice = manufacturingPrice.toLocaleString('en-US', USCurrency);
            }
            else {
                manufacturingPrice = "";
            }

            if (currentItem.get_item('Sale_x0020_Price') != null) {
                salesPrice = currentItem.get_item('Sale_x0020_Price');
                salesPrice = salesPrice.toLocaleString('en-US', USCurrency);
            } else {
                salesPrice = "";
            }

            if (currentItem.get_item('Gross_x0020_Sales') != null) {
                grossSale = currentItem.get_item('Gross_x0020_Sales');
                grossSale = grossSale.toLocaleString('en-US', USCurrency);
            } else {
                grossSale = "";
            }

            if (currentItem.get_item('_x0020_Sales') != null) {
                sales = currentItem.get_item('_x0020_Sales');
                sales = sales.toLocaleString('en-US', USCurrency);
            } else {
                sales = "";
            }

            if (currentItem.get_item('Profit') != null) {
                profit = currentItem.get_item('Profit');
                profit = profit.toLocaleString('en-US', USCurrency);
            } else {
                profit = "";
            }

            txtHTMLFinanceReport += "<tr>" +
                "<TD>" + segment + "</TD>" +
                "<TD>" + country + "</TD>" +
                "<TD>" + product + "</TD>" +
                "<TD>" + unitsSold + "</TD>" +
                "<TD>" + manufacturingPrice + "</TD>" +
                "<TD>" + salesPrice.toLocaleString() + "</TD>" +
                "<TD>" + grossSale + "</TD>" +
                "<TD>" + sales + "</TD>" +
                "<TD>" + profit + "</TD>";
            txtHTMLFinanceReport += "</tr>";
        }
        txtHTMLFinanceReport += "</tbody>";

        //Bind the HTML data to the Table
        $("#idFinanceReportList").append(txtHTMLFinanceReport);

        tableFinanceReport = $('#idFinanceReportList').DataTable(
            {
                "columnDefs": [
                    { "targets": [0], "visible": true, "width": "15%" },
                    { "targets": [1], "visible": true, "width": "8%" },
                    { "targets": [2], "visible": true, "width": "8%" },
                    { "targets": [3], "visible": true, "width": "8%" },
                    { "targets": [4], "visible": true, "width": "8%" },
                    { "targets": [5], "visible": true, "width": "8%" },
                    { "targets": [6], "visible": true, "width": "8%" },
                    { "targets": [7], "visible": true, "width": "8%" },
                    { "targets": [8], "visible": true, "width": "8%" }
                ]
            }
        );

        tableFinanceReport.draw();
    }
    function failed(sender, args) {
        alert("Data Reterival Failed: " + args.get_message());
    }

</script>

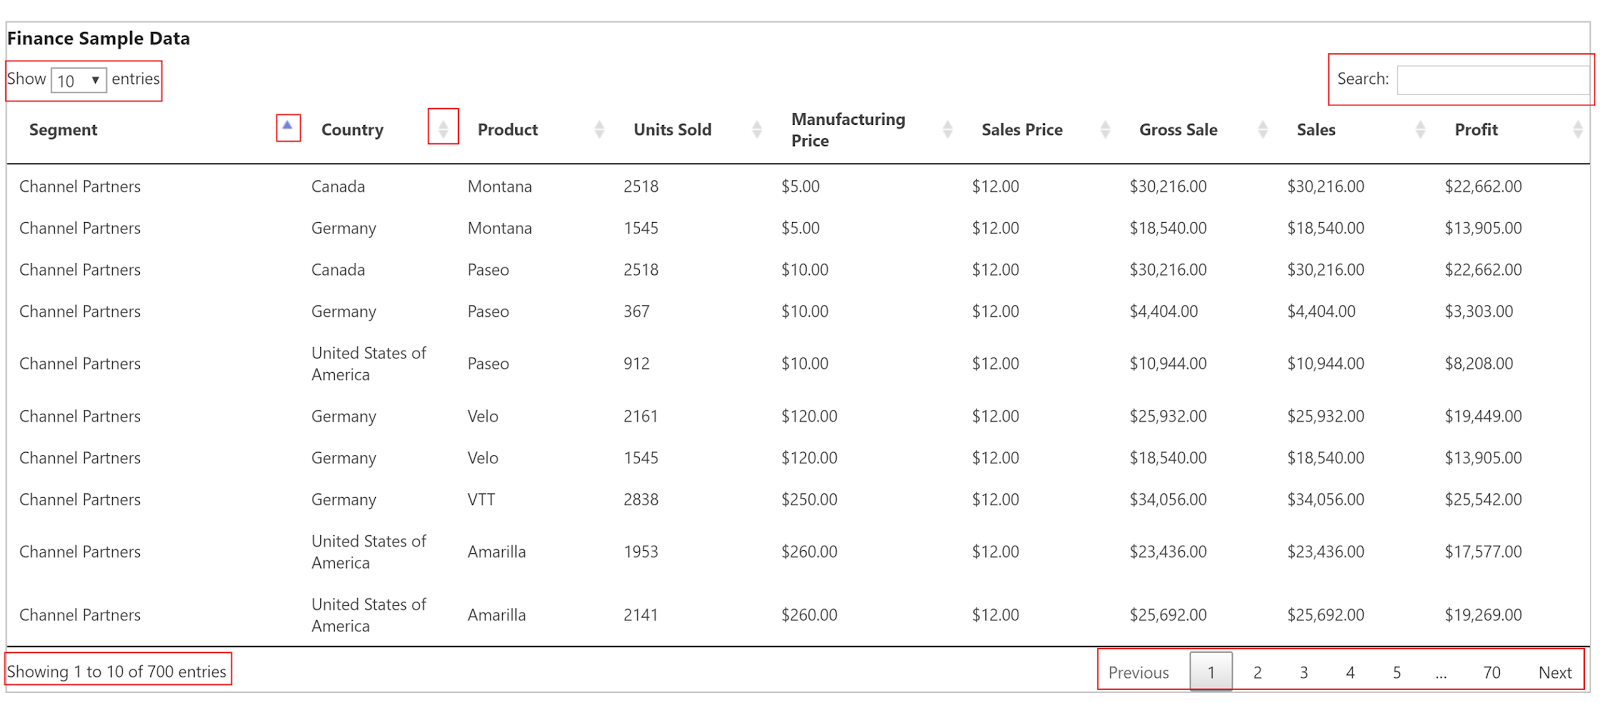
4. Now upload the text file either in a Document Library or preferably in Site Assets. Create a SharePoint page and then add a Content Editor web part. Refer the text file in the Content Editor web part and save it. That's it, we will see a very nice Table rendering the data as shown below:
5. The DataTables.JS has inbuilt functionalities which are listed below:
  • Free text search option (very fast)
  • Abililty of change the number of records display (25, 50, 100..)
  • Paging with Previous and Next options
  • Displays the number of items displayed and also changes the number according to paging
  • Ability to sort the columns both ascending & descending
  • Ability to query a column but hide it from view - if that specific column is required for internal data rendering logic or comparison or etc.
Cool, isn't it? 
Download the Custom List Template with contents (.STP file), JS files, images, text file which has the entire code from this link.🔗
Please free to comment. Always. your comments help me to write more.😃 Share this post to others if this helps you!😇
Don't forget to subscribe to the posts to get notified about new tutorials by clicking the Subscribe button on the top right corner and follow us in social buttons as well.
Happy Shar(Point)ing!

Update 25/07/2017
After reading our blog post, one of our readers shared Angular JS code for implementing the same concept in our Facebook page. Here is the code for reference as a bonus to the readers 😊
////....ANGULAR JS CODE....../////
angular.module('SPapp',['datatables'])
.controller("Splist",function($scope,$http,DTOptionsBuilder){
$http(
{
method:"GET",
url: GetsiteUrl() +"/_api/web/lists/getbytitle('Test')/items?$Select=Title,Job_x0020_Number,Approvl,Username/FirstName&$expand=Username/Id",
headers: { 
"Accept": "application/json;odata=verbose"}
}
).success(function(data,status,headers,config){
$scope.listdata = data.d.results;
}).error(function(data,status,headers,config){
});
$scope.dtOptions = DTOptionsBuilder.newOptions()
.withDisplayLength(10)
.withOption('bLengthChange', false);
});
function GetsiteUrl(){
var urlparts = document.location.href.split("/");
return urlparts[1] + "//" + urlparts[2] + "/" + urlparts[3];
}
////....END of ANGULAR JS CODE - SAVED as spapp.js......///// 

////....SharePoint Code saved as Text File....../////
<!-- JS References -->
<script src="../../SiteAssets/js/jquery-1.12.0.js"></script>
<script src="../../SiteAssets/js/jquery.dataTables.min.js"></script>
<script src="../../SiteAssets/js/angular.min.js"></script>
<script src="../../SiteAssets/js/angular-datatables.min.js"></script>
<link href="../../SiteAssets/js/jquery.dataTables.min.css" rel="stylesheet">
<script src="../../SiteAssets/js/spapp.js"></script>
<!--HTML TAGS-->
<div ng-app="SPapp" ng-controller="Splist">
<table datatable="ng" dt-options="dtOptions" id="myTable" class="table table-striped table-bordered" cellspacing="0" width="100%">
<thead>
<tr>
<th>Title</th>
<th>Username</th>
<th>Approvl</th>
<th>Job Number</th>

</tr>
</thead>
<tfoot>
<tr>
<th>Title</th>
<th>Username</th>
<th>Approvl</th>
<th>Job Number</th>
</tr>
</tfoot>
<tbody>
<tr ng-repeat="listdatas in listdata">
<td>{{listdatas.Title}}</td>
<td>{{listdatas.Username.FirstName}}</td> 
<td>{{listdatas.Approvl}}</td>
<td>{{listdatas.Job_x0020_Number}}</td>
</tr>
</tbody>
</table> 

</div> 
////....SharePoint Code....../////

Jun 28, 2017

Cascading drop down in SharePoint using REST API

Cascading drop down or filtered Lookup Columns in SharePoint is one of the most used functionality in most of the projects for various business needs.
In one of my old articles, I have explained about creating cascading or filtered lookup columns using JQuery & SPServices in MOSS 2007 version of SharePoint. 
This solution has limitations such as this will work only in List Forms and it may not work after certain limit of values in the drop down.
Previous articles reference 
CAML Query tutorial for SharePoint
Multi value Lookup Columns in SharePoint
In this article, we will learn to implement Cascading or Filtered Lookup Columns in latest versions of SharePoint using REST API (applicable to SharePoint 2013, Office 365 – SharePoint Online, SharePoint 2016). REST API uses OData (Open Data Protocol) services to read/write/update data in SharePoint.
I have created 2 lists with the following information as shown below:
  1. Drinks 
  2. Drinks Type (Drink column is a lookup column to display Title from Drinks List)             
             
Now create a list to test the cascading or filtered lookup functionality. I have created a list with “Drinks Menu” as the name. 
             
Please note, the Drinks and Drink Type columns are created as Choice type and all the values from Drinks and Drink Type are added as choices in these fields. This is implemented in this way so that we can avoid the issue surfaces when we have large number of options in Lookup Column. 
Also, if you add a new value to parent lists (Drink or Drink Type lists in this scenario), add the values as choice in the cascading lookup value implementation list ( Drink Menu list in this scenario).
Now, click on the new item which will open the “NewForm.aspx” -> Edit the page -> Add a Web Part -> Insert -> Categories -> Media and Content -> Script Editor -> Click Add to add it.
In the Script Editor, click Edit Snippet and add the CascadingDropdown.js (download from the below attachment). I have referred “JQuery.1.12.0.min.js” in the code which is also available for download. Make sure JQuery is referenced properly in your code else, the script won’t work.
Following are the scenarios, I have covered in this example:
When “Drinks” drop down is not selected or changed to empty, then “Drink Type” & “Price” fields should be disabled and empty

When “Drinks” is selected, “Drink Type” should cascade (filter the values) and show the types based upon selection
When “Drink Type” is selected, the “Price” should automatically populate in the Price field
The data saved to the list will look as shown below:
JS code for cascading the lookup values (Drinks -> Drink Type) is shown below:
//Function to filter the values of Drink Types
function loadDrinkTypes(selectedDrink) {
    var drinkTypeListName = "Drink Type";
    var drinkTypeListURL = _spPageContextInfo.webAbsoluteUrl + "/_api/web/lists/getbytitle('" + drinkTypeListName + "')/items?$select=Title,Drink/Title,Drink/Id&$expand=Drink&$filter=Drink/Title eq '" + selectedDrink + "'";
    getReqData(drinkTypeListURL, function (data) {
        var items = data.d.results;
        if (items.length > 0) {
            var optionsAsString = '<option value=""></option>';
            for (var i = 0; i < items.length; i++) {
                optionsAsString += "<option value='" + items[i].Title + "'>" + items[i].Title + "</option>";
            }
            $('select[title="Drink Type"]').html(optionsAsString);
        }
    },
        function (data) {
            //alert("Some error occurred in getting Drink Types");
        });
}

//JQuery AJAX to access REST API JSON data
function getReqData(reqUrl, success, failure) {
    $.ajax({
        url: reqUrl,
        method: "GET",
        headers: { "Accept": "application/json; odata=verbose" },
        success: function (data) {
            success(data);
        },
        error: function (data) {
            failure(data);
        }
    });
}
JS code for setting the Price value automatically on Drink Type selection is shown below:
//Function set the Drink Price 
function setDrinkPrice(drinks, drinkType) {
    var drinkTypeListName = "Drink Type";
    var drinkTypeListURL = _spPageContextInfo.webAbsoluteUrl + "/_api/web/lists/getbytitle('" + drinkTypeListName + "')/items?$select=Price&$filter=(Drink/Title eq '" + drinks + "') and (Title eq '" + drinkType + "')";
    getReqData(drinkTypeListURL, function (data) {
        var items = data.d.results;
        if (items.length > 0) {
            var price = "";
            for (var i = 0; i < items.length; i++) {
               $("input[title='Price']").val(items[i].Price);
            }
        }
    },
        function (data) {
            //alert("Some error occurred in getting price");
        });
}
Please download the full code to view how each method are called in document.ready()
Note:
1. The above code is tested in SharePoint Online (all the lists are in Classic Mode and not Modern List views in SP Online)
2. It should work in SharePoint 2013 and 2016 versions as well
Please free to comment. Always, your comments help me to write more.😃 Share this post to others if this helps you!😇
You’re still here? I don’t have anything else for you sorry. It’s straightforward. Go… go make some users happy. 😎😀
Update: 06/07/2017
To know about implementing multi-value lookup column and filtering values, read this article: Multi value Lookup Columns in SharePoint

Jun 20, 2017

Accessing Checkbox in SharePoint using JQuery

I couldn't find anything obvious for accessing SharePoint Check Box so chucked this together, hopefully useful for someone else 😉😎
Note: The below code/solution is applicable to accessing check box in a custom SharePoint List forms using SharePoint Designer. To know how to create a custom form in SharePoint Online, read this article Get Current Logged in User & Manager using REST API in SharePoint OnlineAccessing Check Box control in SharePoint is little tricky than accessing the check box in HTML. The reason being, Check Box control is rendered as a table instead of a single control as shown below (Check Box and its preview in developer tools - Chrome):
So, each check box is rendered inside SPAN tag in a table. To access the normal SharePoint controls, we will use either ID or title property but for Check Box it is little complicated.
The actual check box control is in "input" tag 2. The values (Example here: A, B) are inside "label" tag 3. But each control (Yes & No) are represented by ID which is generated by SharePoint 4. If you look at the ID, there is "ff5" which is the ID of the control generated randomly by SharePoint
Now, open the designer, add an ID to the TD of the Check Box so that we can query it easily using JSOM as shown below:
//Get the checked values of Check Box
$("input[id ^= 'tdLanguage']").is(function(){
    var checked = $(this).is(":checked"); //is checkbox checked (true/false)?
    var theVal = $(this).next().text();  //get the label for this checkbox
    alert(checked + " : " + theVal);
});
//Check if checkbox is selected or not
($("#tdLanguage").children().find('input:checkbox').is(':checked'))
//Check box checked or not - single check box type in SharePoint
$("td[id='tdLanguage'] input:checkbox[name*='ff5']").is(":checked")
//Check all the values of checkbox
$("td[id='tdLanguage'] input:checkbox[name*='ff5']").attr('checked',true )
//Uncheck /Clear all checkbox values
$("td[id='tdLanguage'] input:checkbox[name*='ff5']").attr('checked',false )
*** "'tdLanguage'" is the ID of the SharePoint Radio Button Control, "ff5" is the unique ID of the SharePoint Control in your List form. Change this ID according to your form to get the exact result.
Please share your valuable comments which will make me write more and also share this post using the below social buttons to others.
Happy Share(ing)Point! 👍

Dec 13, 2016

Character Limit using JQuery in SharePoint

In this post, we will learn how to implement Character Count (here in this example, maximum allowed 2000 characters) using JQuery in SharePoint.

Prerequisite:
1. Create a SharePoint List with a column named "Comments" - data type Multi line text with plain text as the option selected
2. SharePoint Designer 2013 for editing the SharePoint list with span and to identify the ID of the field created

Solution:
1. Open the SP site in SharePoint designer, navigate to the list -> Create a custom new form -> Edit it.
To know how to create a custom new form in SharePoint Designer, read this article.
2. Below is the HTML code for my "Comments field in SharePoint Designer:

 1
 2
 3
 4
 5
 6
 7
 8
 9
10
11
12
<tr>
    <td width="190px" valign="top" class="ms-formlabel">
        <H3 class="ms-standardheader">
   <nobr>Enter your comment:</nobr>
  </H3>
    </td>
    <td valign="top" class="ms-formbody" style="background-color:#ffffff; width:400px;">
        <SharePoint:FormField runat="server" id="ff6{$Pos}" ControlMode="New" FieldName="Comments" __designer:bind="{ddwrt:DataBind('i',concat('ff6',$Pos),'Value','ValueChanged','ID',ddwrt:EscapeDelims(string(@ID)),'@Comments')}" />
        <SharePoint:FieldDescription runat="server" id="ff6description{$Pos}" FieldName="Comments" ControlMode="New" />
        <span title="2000" id="commentsCount">2000</span><span> Characters Left</span>
    </td>
</tr>
Make a note that I have added a Span tag below the SharePoint control to display the Characters. Also, we have declared it as 2000 characters for this example.
Now, add a script tag or a separate file (then refer it inline) -> add the below code in it save it:

 1
 2
 3
 4
 5
 6
 7
 8
 9
10
11
12
13
14
15
16
17
$(document).ready(function() {
 //Character count for comments text
 $("textarea[name*='ff6']").keyup(function () {
  characterCount('ff6', '#commentsCount');
 });
});

//Character count for multiline text 
function characterCount(controlID,spanId)
{
  var controlVal = $("textarea[name*='" + controlID + "']");
  var cmax = $(spanId).attr("title");
  if(controlVal.val().length >= cmax) {
      controlVal.val(controlVal.val().substr(0, cmax));
   }
  $(spanId).text(cmax - controlVal.val().length);            
}
In this above JS, "ff6" is the ID of the SharePoint control.
Save the form and JS, try typing inside the control you can see the characters been automatically counted and decreases as you type. Cool Isn't it? 😉
Please share this post by clicking the below social buttons if this helps you😎
Happy coding! 

Oct 17, 2016

Accessing Radio Buttons using JQuery in SharePoint Online

I couldn't find anything obvious for accessing SharePoint Radio Buttons so chucked this together, hopefully useful for someone else :)
Note: The below code/solution is applicable to accessing radio button in a custom SharePoint List forms. To know how to create a custom form in SharePoint Online, read this article 
Accessing Radio Button control in SharePoint is little tricky than accessing the radio buttons in HTML. The reason being, radio buttons are rendered as a table instead of a single control as shown below (radio button and it's preview in developer tools - Chrome):

So, each radio button is rendered inside SPAN tag in a table. To access the normal SharePoint controls, we will use either ID or title property but for Radio Buttons it is little complicated.
1. The actual radio button control is in "input" tag 
2. The values (Example here: Yes, No) are inside "label" tag 
3. But each control (Yes & No) are represented by ID which is generated by SharePoint 
4. If you keenly look at the ID, there is "ff41" which is the ID of the control generated randomly by SharePoint.

Now, open the designer, add an ID to the TD of the Radio button so that we can query it easily using JSOM as shown below:

1
2
3
4
//Radio button change event
$("td[id='tdApproved'] input:radio[name*='ff4']").change(function(){
     // do something
});

1
2
3
//Clear the values of radio button - reset the values of radio button
$("td[id='tdApproved'] input[name*='ff4']")[0].checked = false;
$("td[id='tdApproved'] input[name*='ff4']")[1].checked = false;

1
2
3
4
//Checking the value of radio button
if($("td[id='tdApproved'] input:radio[name*='ff4']:checked +  label").text() != 'Yes'){
    // do something
} 

1
2
//Focus Radio button 1st element in control
$("td[id='tdApproved'] input:radio[name*='ff4']:eq(0)").focus();

1
2
3
4
5
6
7
8
9
//Align all Radio Buttons in the page horizontally
function HorizontalAlignChoices() {
    var objSpans = $(".ms-RadioText");
    objSpans.each(function () {
        if ($(this).is("span")) {
            $(this).closest("tr").css({ "float": "left" });
        }
    });
}

*** "tdApproved" is the ID of the SharePoint Radio Button Control, "ff4" is the unique ID of the SharePoint Control in your List form. Change this ID according to your form to get the exact result.
Please share your valuable comments which will make me write more and also share this post using the below social buttons to others. 
Happy Share(ing)Point!   

Update: 21/06/2017
Read this article, to know how to access Checkbox in SharePoint using JQuery 😎

Oct 13, 2016

Get Current Logged in User & Manager using REST API in SharePoint Online

Scenario: 
Environment: SharePoint Online 
Approach:      Populating Current logged in user in People Picker. Also populating user's Manager automatically using REST API and SP Services.
Solution:
1. Create an SharePoint custom list "Learning" (in my case).
2. Create two columns with the following names and data types shown below:
         Internal Name                      Title                                                   Type
CurrentLoggedinUser           Current Logged in User Person or Group (People Only)
Manager                              Manager Person or Group (People Only
3. When you try adding a new item in the list, it should look like:
Here the two people pickers are SP 2013 people picker type where it will show the matching users while typing few words automatically.
4. Now open the list in SharePoint Designer, Create a New Custom Form and make it as default as shown below in the screenshots:

Open the new custom form in Advanced Mode, where you can edit the List Form. Try viewing the page by clicking F5 or Preview in Browser icon in top left corner in the designer.
5. You can see the difference in People Picker. When you create a custom list form, the default forms are automatically changed to SharePoint old type. (for more details read this blog).
6. Now add the ID for both fields as shown below. Also, add the reference the JQuery in the form 
7. Now add the ID's for the two people picker values so that it will be useful for querying the SharePoint controls as shown below
 8. Add a JS file ("Learning.js") in the Site Assets Library and refer it in the new form. Add the below code in the newly created "Learning.js" file.

 1
 2
 3
 4
 5
 6
 7
 8
 9
10
11
12
13
14
15
16
17
18
19
20
21
22
23
24
25
26
27
28
29
30
31
32
33
34
35
36
37
38
39
40
41
42
43
44
45
46
47
$(document).ready(function() {
 var userAccountName= $().SPServices.SPGetCurrentUser();
 //Set current logged in user and manager name in people picker
 LoadPeoplePickerDetails();
 //Show the form fields on document.ready()
 $("#onetIDListForm").show();
});
 
/****************** All function defintions starts here********************************/
//Function to set people picker values
function LoadPeoplePickerDetails()
{
 var url=_spPageContextInfo.webAbsoluteUrl + "/_api/SP.UserProfiles.PeopleManager/GetMyProperties"
 getReqData(url,function(data){    
 try 
 {
         //Get properties from user profile Json response  
         var userDisplayName = data.d.DisplayName;
         var AccountName = data.d.AccountName;
         $("#tdCurrentUser [id$='upLevelDiv']").html(AccountName);
         $("#tdCurrentUser [id$='checkNames']").click();
         var Manager = data.d.ExtendedManagers.results;
         $("#tdManager [id$='upLevelDiv']").html(Manager[Manager.length-1]);
         $("#tdManager [id$='checkNames']").click();             
 }
 catch(err){
   
  }               
     },
     function(data){
       //alert("some error occured in getting current User info");
     });
}

function getReqData(reqUrl,success, failure) {
 $.ajax({
  url: reqUrl, 
  method: "GET",
  headers: { "Accept": "application/json; odata=verbose" },
  success: function (data) {
   success(data);
  },
  error: function (data) {
   failure(data);
  }
 });
}
9. Save the JS and the custom new form as well.
10. Now, try adding a new item. The current logged in user and the current logged in user's manager name will be automatically set in the people picker as shown below.

11. It is basically, on document.ready(), REST API call is made and it populates the data on the form load.

Note: 
1. The people picker for Manager field is loaded after getting the value from current logged in user field. Hence if you have to change the user, the manager value is set during document.ready(). If you want to change the user and set the manager field, then write a method for setting value of manger and call it on value set in first people picker
2. I have implemented only in  Custom New Form only.

For ease of use, I have shared the js and the List Template. Please use this link to download.

In the above tutorial, you have learned how to create a Custom Form in SharePoint Online, make REST API calls and also set the values to the People Picker in the list form.

Please share your valuable comments which will make me write more and also share this post using the below social buttons to others. Happy Share(ing)Point!    

Feb 13, 2012

Cascading dropdown (or) Filtered Values in Lookup Columns in SharePoint

Update: 27/06/2017
To know about implementing Cascading drop down or filtered lookup in SharePoint 2013 or SP Online using REST API, read this article: Cascading drop down in SharePoint using REST APIUpdate: 06/07/2017
To know about implementing multi-value lookup column and filtering values, read this article: Multi value Lookup Columns in SharePointTo know about the Basics of Lookup Columns read this article.Also, to know about the Enhancements of Lookup columns in SharePoint 2010 read this article.
Problem:
In SharePoint the cascading or the filtered values in the lookup columns are not present by default.
In this article, we will achieve this using the simple JavaScript.
Solution:
Consider the simple scenario that the user needs to input the values of Continent, Country, State and City which has to be the filtered values.
Steps:
1. Create four lists with the following column and corresponding types
Note: 
I haven’t used the default title column for any of the lists above and I have hide it from the default view.
To know how to hide the default title column from the list read this article.
2. The screen shots of the four custom lists created in the step 1 are shown below:


3. Now, we will create another custom list for testing the cascading dropdown in the SharePoint. Create a custom list with the following column and corresponding types
The screen shot of the created list is shown below:
4. When we click on the dropdowns in continent, country, state or city we will get the unfiltered values as shown below:
5. Now we add the java script to achieve the solution
General Code to be added:
 1
 2
 3
 4
 5
 6
 7
 8
 9
10
// Execute the following JavaScript after the page has fully loaded, when it's ".ready"
$(document).ready(function(){
    $().SPServices.SPCascadeDropdowns({
        relationshipList: "Display Name of Master List",
        relationshipListParentColumn: "Parent Column Internal Name from Master List",
        relationshipListChildColumn: "Child Column Internal Name from Master List",
        parentColumn: "Parent Column Display Name from List/Library",
        childColumn: "Child Column Display Name from List/Library"
    });   
});
Description of the code
Note:
To know how to get the Internal Name of a column in a list in SharePoint, read this article.
Download of JQuery referred in the code can be found from jquery.com and codeplex.com
For ease of download for the readers, I have uploaded the script in the below links. Click to download the jquery-1.4.2.min.js and jquery.SPServices-0.5.3 min.js
Code in our case:

6. Now, we will insert this JQuery and achieve the cascading dropdown.
7. Click on New in the created custom list (Cascading Lookup Demo) as shown below:
8. Now, we will insert a Content Editor Web Part in the newform.aspx to place the JavaScript code in it.
 To know how to insert a web part in the NewForm.aspx without using SharePoint Designer read this article.
9. After inserting the web part, paste the code and save the web part.
Note: Place Content Editor Web Part below the list form or else the Java Script added won’t work.
10. We are done! Now, we will check the cascading drop down. So, when the continent is selected only countries with respect to the continent should be displayed (Filtered values) and then the state, city in the same case.
The results of various scenarios are shown below:


I have checked for the empty values scenario also. What if the child column is empty or does not contain values. Then after inserting the value, it should add empty values in the column as shown below:
After inserting the values the list is as follows: 
Advantages:
Ø  We can simply achieve the cascading drop down in lookup columns in SharePoint without using any third party tools
Ø  No need of SharePoint designer to achieve this result
 Disadvantages:
Ø  This won’t work in the Data Sheet View since we are inserting the J query in the aspx page only.
Ø  When the number of items in a look up column is greater than 20 then your drop down will change as follows:
We had more than 20 states in the States List (28 items with lookup values)
This happens only in the IE and not in the Chrome or any browsers.
Have a look at the page in the Chrome Browser:
The reason for this variations and the fix is explained well in this article. Below is the link
Hope you have read a nice article.
Please free to comment. Always, your comments help me to write more.
Share this post to others if this helps you!
Note:
I have updated the code of this article on 08.06.2012 since readers of this article requires the following:
1. What is the case if there are more than 2 values (4 cascading or filtered values – using more number of variables)?
2. What is the case if there is an empty string in the child value?
3. To explain the solution with more details for ease of reading and understanding for the readers.
Update: 27/06/2017To know about implementing Cascading drop down or filtered lookup in SharePoint 2013 or SP Online using REST API, read this article: Cascading drop down in SharePoint using REST APIUpdate: 06/07/2017To know about implementing multi-value lookup column and filtering values, read this article: Multi value Lookup Columns in SharePoint