Aug 7, 2013

Create Custom Page Layouts in SharePoint 2013

In this article we will learn how to create Custom Page Layouts for SharePoint 2013. Like SP 2010, we can create Custom Page Layouts in SharePoint 2013 using Visual Studio 2012 and Microsoft SharePoint Designer 2013 either from the scratch or by using the existing Layouts.

New in SharePoint 2013:
In SharePoint Designer we have a new feature called “Design Manager” (under Look and Feel) where we can create a Custom Layout. Once created, it will be available in the Page Layouts Gallery.

Steps:
1.   Navigate to Site Settings -> Look and Feel -> Design Manager
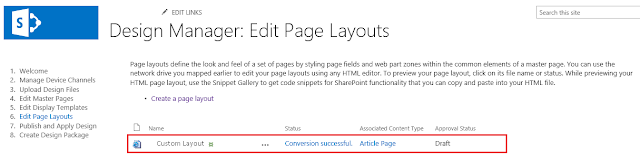
   2.   Under Design Manager Click on 6. Edit Page Layouts -> you have an option to “Create a page Layout” and then create it.


  3.   When the Layout is created, it is available in Edit Page Layouts (under Look and Feel -> Design Manager) and in Master pages and page layouts (under Web Designer galleries)


  4. In the Master pages and page layouts section, you will see two files created for the layout created. .aspx and .html files”
  5.  For editing the layout page, either you can download the HTML page from the Layouts Gallery or edit the HTML files in the SharePoint Designer
    Note: No Changes should be made to .aspx file in the layouts gallery.
  6.  Once the changes are made in the HTML file, upload the updated HTML file to the gallery so that the .aspx file updated automatically.
  7.   Check in and Publish the created layouts 

  8. Now, create pages (Site Settings -> Pages -> Create Page using New Document -> Page and select the Custom Page Layout which is created) 
Hope this helps you!

Jul 22, 2013

Creating Master Page with HTML Templates in SharePoint 2013

SharePoint 2013 has many new and improved design features for designing and branding it. In SP 2013, a new concept called Design Manager has been introduced where all the site branding is managed. The following article explains the step by step process of converting HTML Master Pages for using Design Manager and using the converted Master Page for the site collections.

Steps:
     1.   Create a Site Collection using Central Administration
     2.   Go to the Site Settings -> Enable SharePoint Publishing Feature in Site Collection Feature (Site Collection Administration -> Site Features) and Site Features level (Site Actions -> Site Features) as shown below:


    3.   Go to Site Settings -> Web Designer Galleries -> Master Pages and Page Layouts
    4.   I have created a folder called Custom Master Page inside the Master Pages and Page Layouts Folder and uploaded the HTML, CSS, JS, Images in the folder
    5.   Now navigate to Site Settings -> Look and Feel -> Design Manager -> Edit Master Pages -> Click Convert an existing HTML to Master Page 
  6.   Once converted you will see the converted Master Page in the List with the status Conversion Successful and make sure it is approved and published.
    7.   Now navigate to Site Settings -> Look and Feel -> Page Layouts and Site Templates select the Custom master Page created and use it for the site collection.
For branding in SP 2010 we need good web designing skills (HTML, CSS and JS). But in SP 2013 it has made very simple and easy! 

Jul 8, 2013

Audit Logging in SharePoint 2013

Audit Logging gives the following information in Site Collection:

  1. Opening or downloading documents, viewing items in lists, or viewing item properties
  2. Editing items
  3. Checking out or checking in items
  4. Moving or copying items to another location in the site
  5. Deleting or restoring items
  6. Editing content types and columns
  7. Searching site content
  8. Editing users and permissions
Below are the steps to achieve:                                                                 
       1. Go to Central Administration -> Manage Service Applications


    2. Choose Secure Store Service 
 

    3. Then Click on the Properties in the Ribbon
4. In the Enable Audit option Select the Check Box Audit Log Enabled (the default value is 30 days and it can be changed)
5After enabling the Audit Logging in Central Administration, we have to configure the audit settings at the site collection level and below are the steps:
Go to Site Settings -> Site Collection Administration -> Site Collection Audit Settings 
Under this settings, select the settings as shown below:

 Now, Audit Logging is configured for the site and now you can view the following types of Reports.
Checking the Reports Generated for the Site Collection
Go to Site Collection Administration -> Audit Log Reports
Once you click on any reports, it will ask for the Report Save location. Select any of the Libraries to store the Report.
Example Report Generated Screenshot:
 
 Select an Library to store the Report and Click OK
Report Generated in Excel

Hope this article helps you in understanding the Audit Logging in SharePoint 2013. Please feel free to share and comment about this post if it helps you.

Mar 19, 2013

Unexpected error occurred while communicating with Administration Service

Scenario:
I ran into the following issue when attempting to access  Fast search features such as:
1. FAST Search keywords
2. Fast Search site promotion and demotion
3. Fast search user context

Solution:
I checked my Administrators group in the SP server. Fast Search ADMIN account configured is added in the Administrators group. Though I am unable to access these features.
Then found the resolution from a TechNet article.
1.   Create a group named FASTSearchKeywordAdministrators in the SP server (this group is not automatically created during default installation).
2.   Add the Fast Search ADMIN account (account configured for fast search) to this group.
Then tried accessing the features and everything works as expected.

Mar 2, 2013

Sign in as different user in SharePoint 2013

In all the versions of SharePoint, we have option for signing in as different user which helps us in various scenarios. Also, it helps in testing purposes.
But in SharePoint 2013, we do not have this option. 

In this article we will know how to achieve this:

1. When you log in to a SharePoint site, you don't have sign in as different user option which is shown as below:

2. To overcome this limitation either we have to sign in to the IE as different user and then we can log in to the SharePoint site as different user.
3. To achieve this in SharePoint (which is like option in older versions of SharePoint), we need to modify the welcome.ascx which is present in the 15 hive of SharePoint server.
4. Navigate to the below path and find the welcom.ascx file.
C:\Program Files\Common Files\microsoft shared\Web Server Extensions\15\TEMPLATE\CONTROLTEMPLATES
5. Open the file in the visual studio or in the notepad and add the following code above the tag which has ID_RequestAcess as shown below:

<SharePoint:MenuItemTemplate runat="server" ID="ID_LoginAsDifferentUser" Text="<%$Resources:wss,personalactions_loginasdifferentuser%>"
Description="<%$Resources:wss,personalactions_loginasdifferentuserdescription%>"
MenuGroupId="100"
Sequence="100"
UseShortId="true"
/>

 6. Save the file and now refresh the site, you will see the SharePoint page with option "Sign in as different user" option as shown below:


 Hope this helps you. Please free to comment. It helps me to write more.

Snipping Tool in Windows Server 2012

Snipping tool is very nice tool for capturing the screens which comes with latest versions of Windows. In this article lets see how to enable the snipping tool in Windows Server 2012.

Snipping tool is not installed in the default installation of Windows OS. We have to enable it manually.

Steps:
1. Go to Server Manager -> Manage Features -> Features -> Select DESKTOP EXPERIENCE under user interfaces and infrastructure -> Next -> Feature will be installed and it will ask for restarting the server.
2. Restart the server and log in to the server. Under Windows accessories you will see the Snipping tool installed.
Screenshots for reference:


Hope this helps you!

Feb 26, 2013

Jan 7, 2013

The feature being activated is a Site scoped feature which has a dependency on a Site Collection scoped feature which has not been activated. Please activate the following feature before trying again: SharePoint Server Publishing Infrastructure f6924d36-2fa8-4f0b-b16d-06b7250180fa

Some times while activating the Publishing feature in SharePoint through the options in Site Settings we will get this error:
The feature being activated is a Site scoped feature which has a dependency on a Site Collection scoped feature which has not been activated. Please activate the following feature before trying again: SharePoint Server Publishing Infrastructure f6924d36-2fa8-4f0b-b16d-06b7250180fa

Reason:
The reason being the "SharePoint Server Publishing Infrastructure" feature has to be enabled at SITE COLLECTION level, then it has to be activated at SITE LEVEL enable the feature. So that we can create Publishing pages in SharePoint.

Solution:
It can be done in many ways (2 ways mentioned below):
1. We can use the Site Settings -> Site Collection Administration -> Site Collection Features to enable this feature.
2. Then Site Settings -> Site Administration -> Site Features -> Enable this feature.
3. We can also achieve this using STSADM command as shown below:
STSADM.EXE -o deactivatefeature -id f6924d36-2fa8-4f0b-b16d-06b7250180fa -url "http://SiteURLHere/" -force
Then,
STSADM.EXE -o activatefeature -id f6924d36-2fa8-4f0b-b16d-06b7250180fa -url "SiteURLHere" -force
Hope this helps you!

Export SharePoint Group to Excel using PowerShell

$siteUrl="SiteURLHere"
$groupName="GroupNametoExport"
$Output = @("GroupName|Name|Login|Email|Department|Title")
$web = Get-SPWeb $siteUrl
$site = $web.Site
$rootWeb = $site.RootWeb
$UserList = $rootWeb.Lists["User Information List"]
$web.SiteGroups[$groupName].Users|%{$user = $UserList.GetItemById($_.ID)
if($user -ne $null)
{
$JobTitle = $user["JobTitle"]
$Department = $user["Department"]
}
$Output += ($groupName+"|"+$_.Name+"|"+$_.UserLogin+"|"+$_.Email+"|"+$ Department +"|"+$JobTitle)
}
$rootWeb.Dispose()
$web.Dispose()
$site.Dispose()
$Output > "D:\MembersExport.csv"

Import Excel to SharePoint List using PowerShell

# Import the .csv file, and specify manually the headers, without column name in the file 
$contents = Import-CSV ‘C:\Input.csv' -header("Employee ID", "Employee Name")
# Web URL
$webURL = “SITEURL here”
$web = Get-SPWeb -Identity $webURL
$listName = "ListNameHere"
$list= $web.Lists["$listName"] 
# Iterate for each list column
foreach ($row in $contents )
{
    $item = $list.Items.Add();
    $item["Employee ID"] = $row.GroupName
    $item["Employee Name"] = $row.Permissions
    $item.Update()
}
Write-Host -ForegroundColor green "List Updated Successfully"
$web.Dispose()

Jan 6, 2013

Import Users from Excel to SharePoint using PowerShell

# Import the .csv file, and specify manually the headers, without column name in the file 
$userList=IMPORT-CSV C:\UserToUpload.csv -header("GroupName","UserName")

#Get the site name to the variable
$web = Get-SPWeb SiteURLHere

foreach ($user in $userList)
{
$groupName = $web.SiteGroups[$userList.group]
$user = $web.Site.RootWeb.EnsureUser($userList.user)
$groupName.AddUser($user)
}
Write-Host -ForegroundColor green "Users Added Successfully"
}
$Web.Dispose()

Add Users to SharePoint Group using PowerShell

#Get the site name to the variable
$web = Get-SPWeb SitURLHere
#Get the group name to the variable
$groupName = $web.SiteGroups["Group Name Here"]
#Assign user to variable
$user = $web.Site.RootWeb.EnsureUser(“User ID Here”)
#Add user to group 
$groupName.AddUser($user)
Write-Host -ForegroundColor green "User Added Successfully";

Dec 18, 2012

SharePoint 2013 Certification

Below is the links to know about initial release for Certifications in SharePoint 2013:

Exam 70-331: Core Solutions of Microsoft SharePoint Server 2013 http://www.microsoft.com/learning/en/us/Exam.aspx?ID=70-331

Exam 70-332:Advanced Solutions of Microsoft SharePoint Server 2013 http://www.microsoft.com/learning/en/us/exam.aspx?ID=70-332


Dec 12, 2012

Web Part with Custom Tool Part in SharePoint

To know about Basics of Creating a Custom Web Part with Validations and Deploying it in the SharePoint, read this article.

In this article, we will know how to create a custom web part in SharePoint with Custom Tool Part (Custom Properties).
Before creating a custom web part with custom tool part, we will know about the basics of Custom Tool Part in SharePoint.

What is custom tool part?
The Custom tool part is part of the web part infrastructure, which helps us to create a custom user interface for the web part properties which is different from default property pane.


Difference between Standard Tool Box and Custom Tool Part Properties
Below is the difference between the Sandbox and Custom Tool Part properties in a web part:
Sand Box Tool Box Properties:This is the tool box that comes by default and it contains Text Boxes, Check Boxes and Drop down lists to fill or select the data. But this tool box does not contain any dynamic controls for displaying the dynamic data from the SharePoint list or libraries. This is something like hard coding the values in the .cs file of the web part.
Custom Tool Part Properties:With the Custom tool part or tool box can contain any asp controls in it and it can bind the data to from the database or list and libraries. Hence displaying the dynamic values or data is possible using this tool box.

List of attributes used for creating a Custom Tool Part

Two Classes used in the Web Part Tool Pane Creation
WebPartToolPart – represents a tool part that can be used to show and modify Web Part base class properties.
CustomPropertyToolPart – used to show and modify the custom properties created in the web part.

Please feel free to share your thoughts and share this post if it helps you!

How does Ribbon in SharePoint 2010 works?

A file called CMDUI.XML stays at the web front end which contains the Out-of-Box site wide Ribbon implementation i.e. all the Ribbon UI for the entire site. In addition to this you have a CustomAction for each ribbon component.

These CustomActions have CommandUIExtentions block which has CommandUIDefinitions and CommandUIHandlers which make up the activity of the ribbon component.

So, when the ribbon is loaded the CommandUIDefinition merges with Out-of-Box definition in the CMDUI.XML

Dec 11, 2012

Consuming a web service using ASP .NET

To know about basics of web service read this article.
To know about creating a web service using ASP .NET read this article.

Background:
In the previous article we have learned about creating a web service. Now in this article, we will learn how to consume a web service using asp .NET.
Real Time Example:
Nowadays mobile application (Mobile Apps) are used widely all the users. Take a scenario, we install the “Weather” gadget in our mobile and check the weather of a particular place.
Think where we are receiving this weather information? It is actually we are consuming the web services.
We will select the region/place to see the weather, a web service will be called and the weather info is displayed.
Hence, Web Services are hosted somewhere and via internet we are consuming the data through the web service.

Implementation:
1. Create an ASP .NET web application with a simple design as shown below:
2. Now, we have to add the web service reference to this Project (Here we use the web service created in the previous article). Click on the Projects in solution explorer -> Add web reference -> give the url of the web service
(Note: to access the web service in the client use the appropriate machine/domain name)
Now, you will see the following screen:
3. Click on Go and search the web service and then give the web reference name say “Consume Service” in our example. Then click Add Reference button.
4. Now, in the solution explorer you will see the Web Reference being added as shown below:
5. We can use the methods exposed by the web service in our code and test the result. Sample code is shown below:
public partial class _Default : System.Web.UI.Page 
{
   protected void Page_Load(object sender, EventArgs e)
   {
   }
    protected void btnToCelsius_Click(object sender, EventArgs e)
    {
        double x = Convert.ToDouble(txtValue.Text);
        if(txtValue.Text != string.Empty)
        {
            try
            {
                ConsumeService.Service service = new ConsumeService.Service();

                lblOutput.Text = service.ToCelsius(x).ToString();                
                
            }
            catch (Exception)
            {
                throw;
            }
        }
    }
    protected void btnToFahreinheit_Click(object sender, EventArgs e)
    {
        double x = Convert.ToDouble(txtValue.Text);

        if (txtValue.Text != string.Empty)
        {
            try
            {
                ConsumeService.Service service = new ConsumeService.Service();

                lblOutput.Text = service.ToFahreinheit(x).ToString();

            }
            catch (Exception)
            {
                throw;
            }
        }
    }
}

6. Build and run the code. Test the result by giving some inputs as shown below:

The whole source code can be downloaded from this link.

Hope the three articles about the web services explained about the basics of web services, creating and consuming the web services using ASP .NET in a simple way.
Please free to comment which help me to write more.

Creating Web Service using ASP .NET

To know about basics of web service read this article.

1.   Create an ASP .NET web service application using Microsoft Visual Studio.
2. Take a scenario that we have to convert Celsius to Fahrenheit and vice versa.
3.   Below is the code for our scenario:
using System;
using System.Web;
using System.Web.Services;
using System.Web.Services.Protocols;

[WebService(Namespace = "http://ConversionWebService.org/Temp")]
[WebServiceBinding(ConformsTo = WsiProfiles.BasicProfile1_1)]
public class Service : System.Web.Services.WebService
{
    public Service () {

        //Uncomment the following line if using designed components 
        //InitializeComponent(); 
    }
    [WebMethod(Description = "Convert Celsius to Fahreinheit")]
    public double ToFahreinheit(double C)
    {
        return C * (9.0/5.0) + 32;        
    }

    [WebMethod(Description = "Convert Fahreinheit to Celsius")]
    public double ToCelsius(double F)
    {
        return (F - 32) * (5.0/9.0);        
    }
   }
4. Build and run the web service, you will see the following output:
5.Now, we will test the web service by giving input values and invoke it.Below are the screen shots which will show the input given and the results:


Hope this article, explains you about creating and running a simple web service using ASP .NET
Here is the link to download the full source code.

To know about consuming a web service using ASP .NET read this article.

Basics of Web Services

Introduction:
In this article, we aim at learning the basics of web services and understand how does web service works.
WebService:
1.   Web services are the easy way to create communications between different applications of different platform.
2.  Web Services extend these models a bit further to communicate with the Simple Object Access Protocol (SOAP) and Extensible Markup Language (XML) to eradicate the object-model-specific protocol barrier.

Components of Web Service:
All the standard Web Services works using following components
  1. SOAP (Simple Object Access Protocol)
  2. UDDI (Universal Description, Discovery and Integration)
  3. WSDL (Web Services Description Language)
SOAP (Simple Object Access Protocol):
SOAP is an XML-based protocol to let applications exchange information over HTTP. Simply, SOAP is a protocol for accessing a Web Service.
  1. It is a communication protocol and it is a format for sending messages.
  2. It is designed to communicate via Internet (W3C standard)
  3. It is platform and language independent
  4. SOAP allows you to get around firewalls
WSDL (WebServices Description language):
It is a W3C standard used to describe and locate the web service in XML language format.
UDDI (Universal Description, Discovery and Integration):
  1. It is a directory for storing information about web service
  2. It communicates via SOAP
  3. It is built on .NET platform
Why web service?
  1. Interoperability
  2. Usability
  3. Deployability
  4. Reusability
For more details on the advantages and disadvantages refer this MSDN article: http://social.msdn.microsoft.com/Forums/en-US/asmxandxml/thread/435f43a9-ee17-4700-8c9d-d9c3ba57b5ef

To know about creating a web service using ASP .NET read this article.
To know about consuming a web service using ASP .NET read this article.

Captcha using Java Script

Background:
Now a days, all the web sites requires inputs (contact us, feedback, etc.) from the end users. But many sites face a problem of spam or unwanted or junk messages. To avoid this we have a java script code which will generate the random codes which should be entered by the users manually.
This avoids the spam being automated or entered by the unwanted users being entered in to the site.

Solution:
Below is the code which consists of Java script implemented in HTML page for reference.

Random Message


Below is the screenshot of the same:
Here is the link to download the image and hmtl file. Captcha using JavaScript.
Hope this component helps using it in your website to avoid spam and unwanted messages.