Jul 29, 2014

SharePoint 2013 & 2010 OOTB Web Parts Comparison

There are many changes made in SP 2013 in OOTB web parts. I tried creating
a summary which shows the following:
1. What category is added or removed in SP 2013?
2. What are the web parts removed from SP 2013?
3. What are the new web parts added and their functionality?

Downloadable Link for the below file: Link to download

Share the post if this helps you!

Jul 23, 2014

Promoted Links in SharePoint 2013

Promoted Links is a new list type added in SharePoint 2013.
What it is and how to use this?
1.   New app in SP 2013 available Out of Box
2.   It is similar app like “Get Started with your site” in the home page 
3.   It is a very cool feature which allows you to add images and links to it and display it in a Tile view in a page for quick navigation.
4.   Let’s create a promoted links app for our SharePoint 2013 home page.
5.   Go to “Add an App” -> Promoted Links -> Give a name “Home Page Navigation”
                    
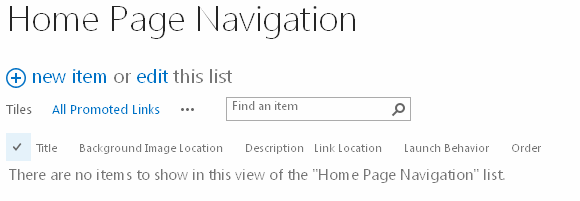
6.   You will see a message. The list is empty, Add tiles from the All Promoted Links view. Now, start adding the images and links in the app as shown below
When you click on the “All Promoted Links” you will see a list view to add items in it.
Adding new item will have the following fields
a.    Title
b.    Background Image Location
c.    Description
d.   Link Location
e.    Launch behavior
f.     Order 

Example of one item added.
Similarly, I have added 4 items in the list.
Now, in the list, if you navigate to the Tile View, you will see the images with the links displayed with Links. Cool Isn't? It is OUT OF BOX. 
If you hover the mouse, the title automatically goes up. You can click and navigate to the desired page.
This list can be displayed in a web part in the site home page which can be used for quick navigation. Please share this if it is useful!

Jul 2, 2014

New Features of SharePoint 2013

It has been a while here, there are many reasons and I was busy as well. Let’s start it again with SharePoint 2013J
SharePoint 2013 has many new features and it is trending in the market. Let’s see the list of features which is new and what is different from the other versions of SharePoint.
  1. HTML 5 and CSS 3 support  - Cross browser compatibility and optimized browser experience.
  2. Device Manager & Device Channels – new way of designing  theme for  the site using SharePoint Designer 2013.
  3. Community Portal – Social Networking  makes collaboration within the organization easier.
  4. New Search Experience (My favorite feature J) - Continuous Crawl – yes, you get the results once you publish the new contents to the site
    Fast Search is integrated in the search feature and it is not a separate product now, licensing becomes easier.
  5. Content Search Web Part – display information from the other web apps which is not possible in other versions of SharePoint – and off course content has to be crawled and indexed for displaying in this web part
  6. Rich Workflows – New actions, no code web service call
  7. Shredded Storage  - removes the duplicate files  and hence reduces the amount of storage in the site
  8. WCM – Managed metadata for navigation and shortening of URL’s
  9. Apps & Apps Store – Create and publish apps
  10. Mobile Experience –  Mobile usage has increased drastically and this feature allows you to view the SharePoint site in three view such as Classic, Contemporary, Full Screen UI.

Oct 29, 2013

The Server could not complete your request SharePoint Designer 2013

Problem:
When I tried opening SharePoint 2013 site in SharePoint Designer, I got the following error:

When I clicked on Details, it opened another dialog and continuously pop up window is opening and not able to open the SharePoint site.

 Finally got an error message
Solution:
    1.   Go to Run -> type Inetmgr -> Open the IIS
    2.   In the Web Sites select “SharePoint Web Services” in the list


    3.   Click on the Authentication and Enable “Anonymous Authentication” as shown below:

   4.   After enabling this, I am able to open the SharePoint site in designer without any issues

Reason for the issue: Check this article http://support.microsoft.com/kb/2758431 

Aug 19, 2013

News feeds not working in SharePoint 2013 - microsoft.office.server.microfeed.microfeedexception

To know about Micro Blogging in SharePoint 2013, read this post.

When I tried to use the News Feed Feature in SharePoint 2013, it thrown exception:
microsoft.office.server.microfeed.microfeedexception
The below is the screenshot: 
 Solution:
As I mentioned in the earlier post about Micro blogging in SharePoint 2013, news feeds are related to User Profile Service.
Hence, we have to check two things which are related to User Profile Service in SharePoint 2013.
    1.   Check whether AppFabric Caching service is running with the service account which has elevated permissions. 

   2.   Next, check the account which is running the User Profile Service application:
     Open Central Administration -> Mange Service Applications -> User Profile S    Service is started and also check the permissions for the service
    
   Click on the User Profile service and in the permission section in the ribbon check whether the service account running this service has full control. 


 If all the above scenarios are properly configured in SharePoint farm, then the news feed will work properly as expected.
Feel free to comment and share this post if this helps you.

Aug 17, 2013

Micro blogging in SharePoint 2013

Introduction:
Microsoft has introduced a new social feature called “Micro blogging” in SharePoint 2013 to enhance the social networking and collaboration features.
This powerful feature is added as an OOTB web part to SharePoint 2013 and ready to useJ

So, what is micro blogging?
It is a type of blog which allows users to share their updates. This updates are called micro posts and the use of this services is called micro blogging.
Ref: http://www.webopedia.com/TERM/M/microblog.html

Micro blogging in SharePoint 2013
The SharePoint Micro Blogging feature is like Facebook and Twitter which allows the users to communicate with others easily, by posting some questions, responding, comments and etc.
Following are the list of features:
  Ø  Update picture and links in the posts and replies
  Ø  Participate in a conversation by posting comments (with rich media and
        Links in the post) and replied
  Ø  Use mentions (@) to tag a user in  a post and in the replies
  Ø  Use tags (#) to define keywords so that the users can follow and search for   the same topic easily
  Ø  Like a post, follow people, documents, sites and tags

   Also, the author’s (one who posts an update or comment or reply for a post)
   presence (online, off-line, busy, in a meeting) are also displayed.

Add the Site Feed web part to the page:
Edit the page -> Insert -> Web part -> Social Collaboration -> Site Feed

 Once added, you will see a dialogue to post your feeds as shown below:
Add a new Post in the Micro blog:
You can add a post by typing your post in the text box and hit post to update your post
Add Rich Media & Links, Delete a Post:

In the Post you can add Rich media such as Image, Video, Links, etc.. Also, you have options of deleting  the post.
Like, Reply, Copy Link to conversation, Follow up, Lock Conversation:
Like other social networking as I mentioned earlier in this post you have options of Like, Reply, Copy Link to Conversation, Follow up and Lock a Conversation :)
Also, there is an option "Show More Posts" to view the old posts.

Tagging a User and Topic
The options of Tagging a user by "@" allows the other user to specifically tag a post to a user and also Tagging a topic by "#" allows the posts to be categorized and also it helps in searching the posts easier.

 See where the Micro blog contents are stored?
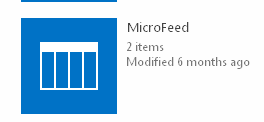
This micro feed are based upon the User Profile Service in SharePoint. This feeds are stored in a list called Micro Feed by default where you will see all the details stored.
Navigate to the following path to view the Micro Feeds:
Check for the Micro Feed List
Clicking on the List, you will see a List with different columns which stores the feeds.

Hope you enjoyed the post. Feel free to share your valuable comments which always make me to write more. Also share this post to your friends if it is helpful. 

Migrate SharePoint 2010 to 2013


In this article, we will learn how to migrate SharePoint 2010 to SharePoint 2013. This migration is applicable for OOTB features migration not for Custom Solution migration to SharePoint 2013.
Steps:
      1. Change the Authentication mode of SharePoint 2010 application to Claims using the PowerShell command
$WebAppName = ""
$account = ""
$wa = get-SPWebApplication $WebAppName
Set-SPwebApplication $wa AuthenticationProvider (NewSPAuthenticationProvider) Zone Default
2.   We have to take the backup of solutions (WSP) from SP 2010 and deploy it in the SP 2013 farm. Use the following PowerShell command to back up the WSP
$farm = Get-SPFarm
$file = $farm.Solutions.Item("Backup.wsp").SolutionFile
$file.SaveAs("C:\Backup.wsp")
3.   Now, deploy the solution to the SP 2013 farm using the following command:
Add-SPSolution -LiteralPath "C:\Backup.wsp" 
(rebuilding the solution in Visual Studio 2012 is required sometimes)
     4.  Now take the backup of Content DB from SP 2010 and attach in SP 2013 database server
Note: This will automatically update the DB schema for SQL server 2012 (which is previously lower version in SP 2010)
    5.   Create a new web application in SP 2013 and after creating the web application detach the Content DB (which is newly created for SP 2013 now)
    6.   Now, attach the backup Content DB (taken from SP 2010) using the following command
Mount-SPContentDatabase -name -WebApplication 
Note: This will automatically update the Dictionary and other required update for SP 2013.
    7.   Now deploy the List templates and other backups from SP 2010 if required.
Note: This is applicable only for OOTB solutions. If you have custom solutions, then you have to re-build the code using Visual Studio 2012 and then deploy the solution.
Hope this helps you and please free to comment and share this post.

Aug 7, 2013

Create Custom Page Layouts in SharePoint 2013

In this article we will learn how to create Custom Page Layouts for SharePoint 2013. Like SP 2010, we can create Custom Page Layouts in SharePoint 2013 using Visual Studio 2012 and Microsoft SharePoint Designer 2013 either from the scratch or by using the existing Layouts.

New in SharePoint 2013:
In SharePoint Designer we have a new feature called “Design Manager” (under Look and Feel) where we can create a Custom Layout. Once created, it will be available in the Page Layouts Gallery.

Steps:
1.   Navigate to Site Settings -> Look and Feel -> Design Manager
   2.   Under Design Manager Click on 6. Edit Page Layouts -> you have an option to “Create a page Layout” and then create it.


  3.   When the Layout is created, it is available in Edit Page Layouts (under Look and Feel -> Design Manager) and in Master pages and page layouts (under Web Designer galleries)


  4. In the Master pages and page layouts section, you will see two files created for the layout created. .aspx and .html files”
  5.  For editing the layout page, either you can download the HTML page from the Layouts Gallery or edit the HTML files in the SharePoint Designer
    Note: No Changes should be made to .aspx file in the layouts gallery.
  6.  Once the changes are made in the HTML file, upload the updated HTML file to the gallery so that the .aspx file updated automatically.
  7.   Check in and Publish the created layouts 

  8. Now, create pages (Site Settings -> Pages -> Create Page using New Document -> Page and select the Custom Page Layout which is created) 
Hope this helps you!

Jul 22, 2013

Creating Master Page with HTML Templates in SharePoint 2013

SharePoint 2013 has many new and improved design features for designing and branding it. In SP 2013, a new concept called Design Manager has been introduced where all the site branding is managed. The following article explains the step by step process of converting HTML Master Pages for using Design Manager and using the converted Master Page for the site collections.

Steps:
     1.   Create a Site Collection using Central Administration
     2.   Go to the Site Settings -> Enable SharePoint Publishing Feature in Site Collection Feature (Site Collection Administration -> Site Features) and Site Features level (Site Actions -> Site Features) as shown below:


    3.   Go to Site Settings -> Web Designer Galleries -> Master Pages and Page Layouts
    4.   I have created a folder called Custom Master Page inside the Master Pages and Page Layouts Folder and uploaded the HTML, CSS, JS, Images in the folder
    5.   Now navigate to Site Settings -> Look and Feel -> Design Manager -> Edit Master Pages -> Click Convert an existing HTML to Master Page 
  6.   Once converted you will see the converted Master Page in the List with the status Conversion Successful and make sure it is approved and published.
    7.   Now navigate to Site Settings -> Look and Feel -> Page Layouts and Site Templates select the Custom master Page created and use it for the site collection.
For branding in SP 2010 we need good web designing skills (HTML, CSS and JS). But in SP 2013 it has made very simple and easy!